 CollectorCtrl
Fleet Orchestration, Canary Rollouts & Drift Control
Define targeting rules, configure atomic or canary rollouts, and deploy across your fleet.
What You'll Learn
- How to access the Fleet Orchestration console
- How to define strategy identity and priority weights
- How to construct multi-attribute Fleet Targeting Rules with real-time reach preview
- How to choose between Configuration Only, Binary Upgrade, or Coordinated rollout focus
- How to configure Immediate (Atomic) vs. Canary (Phased) rollout strategies
- How to review audit notes, deploy, and monitor live propagation across nodes
Time: ~15 minutes
Prerequisites
- A running CollectorCtrl Management Server (Web UI at
http://<server-ip>:4321) - One or more connected Supervisor agents reporting live resource attributes
- Access with administrator or policy-author privileges
Overview: The Fleet Orchestration Console
In the CollectorCtrl left navigation menu, click Fleet Orchestration.
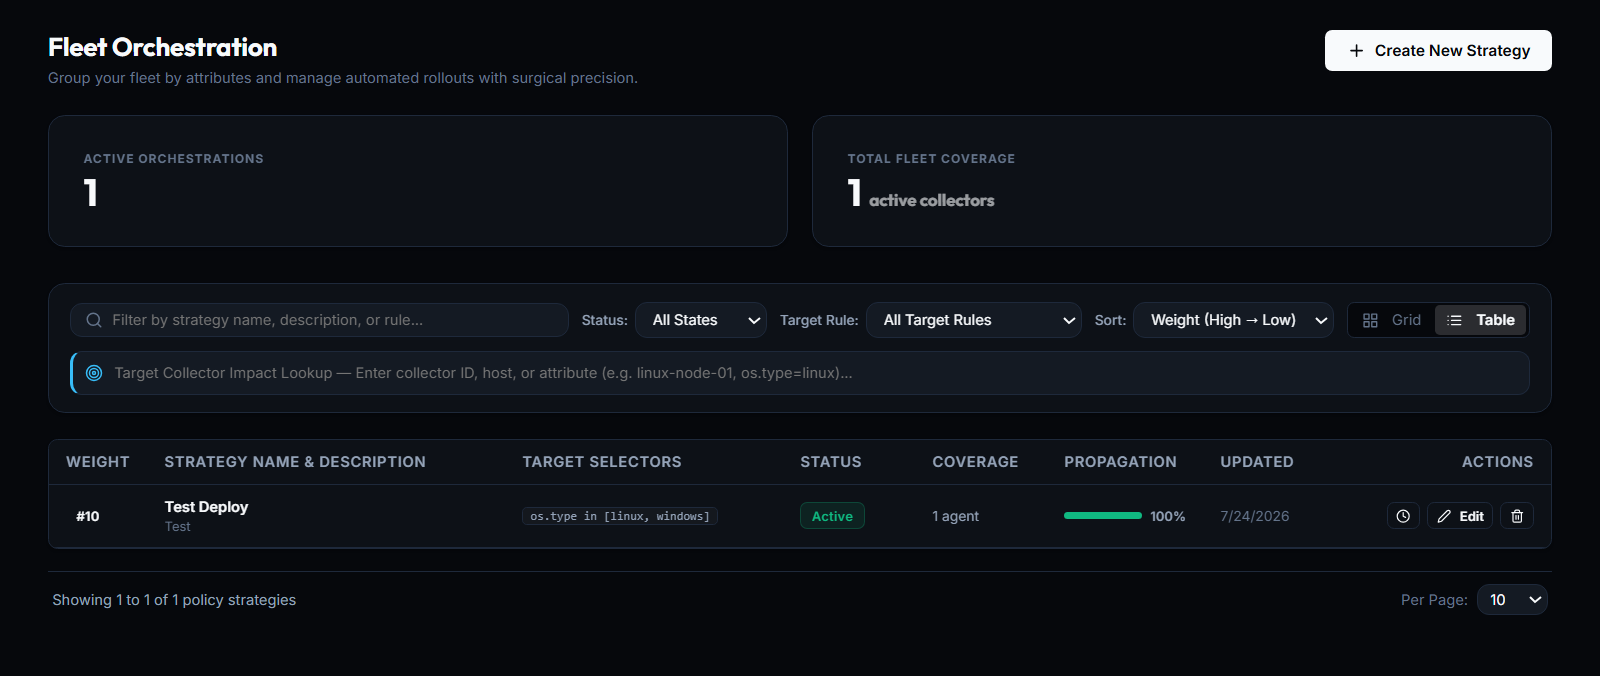
The Fleet Orchestration dashboard provides:
- Active Orchestrations: Total number of currently active rollout strategies.
- Total Fleet Coverage: Aggregate number of active collector agents targeted across all policies.
- Target Collector Impact Lookup: Search by collector ID, hostname, or attribute (e.g.
linux-node-01,os.type=linux) to immediately see which policy strategies govern any specific agent. - Strategies Inventory Table: Inspect strategy priority weight, targeting selectors, deployment status, coverage, and live rollout propagation percentages.
 Expand
To create a new policy, click the + Create New Strategy button in the top-right corner. This opens the 5-step Define Orchestration Strategy wizard.
Step 1: Define Strategy Identity
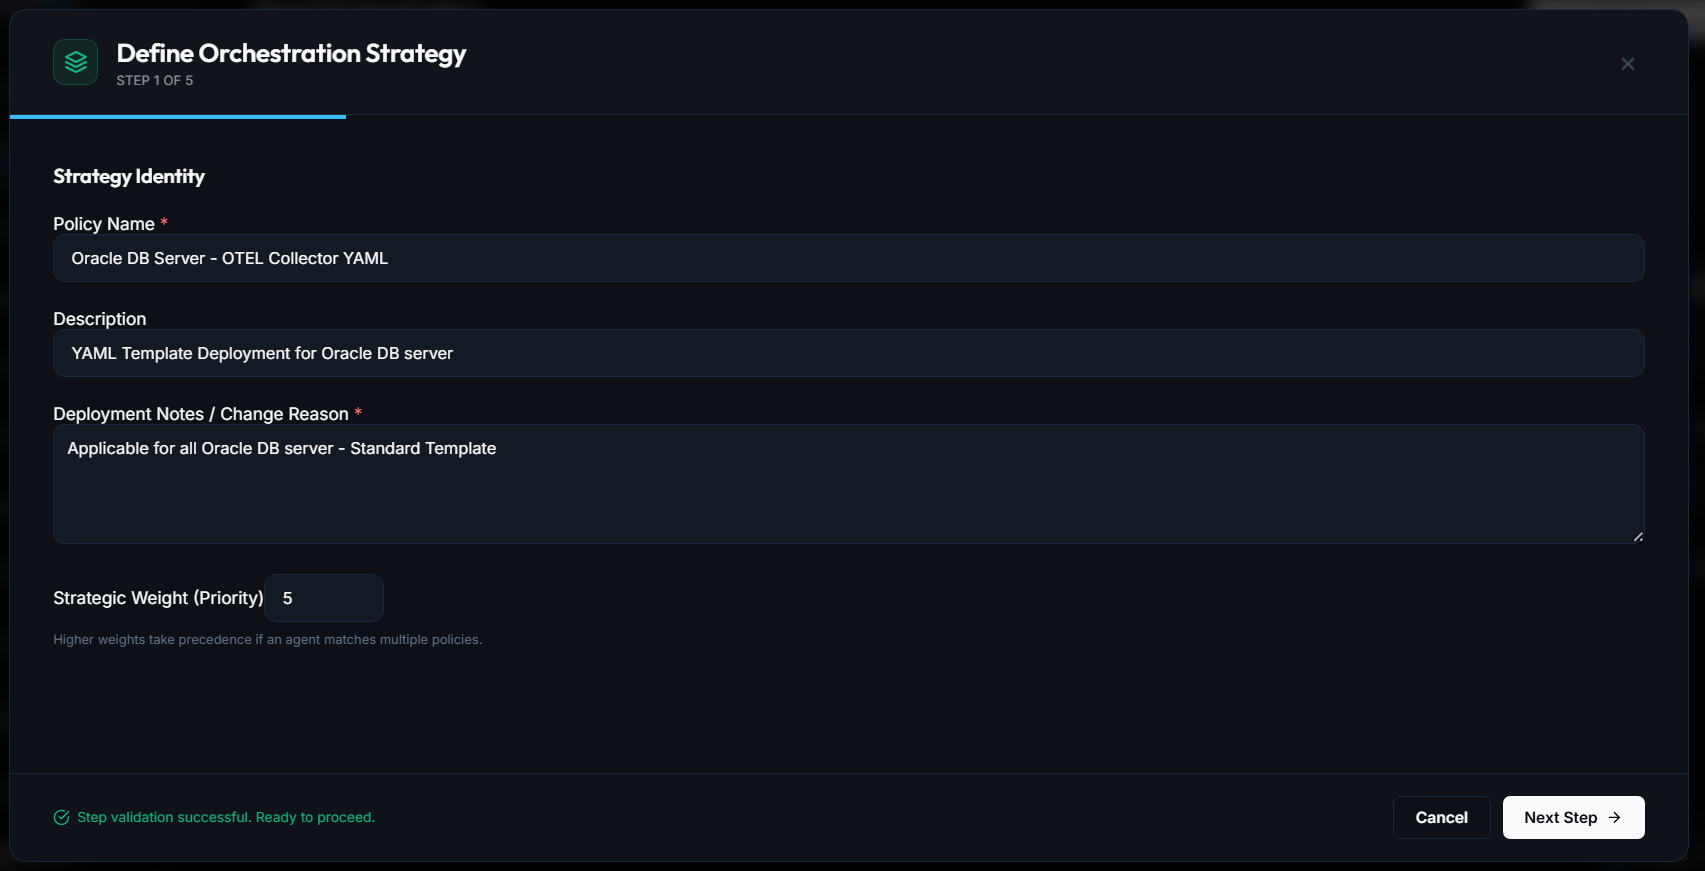
The first step establishes the identity, documentation, and evaluation precedence for your policy:
 Expand
Fill in the strategy identity fields:
| Field | Example | Purpose |
|---|---|---|
| Policy Name * | Oracle DB Server - OTEL Collector YAML | A human-readable name identifying the workload or team. |
| Description | YAML Template Deployment for Oracle DB server | Summary of what this policy configures and monitors. |
| Deployment Notes / Change Reason * | Applicable for all Oracle DB server - Standard Template | Audit-compliant record explaining why this change is being deployed. |
| Strategic Weight (Priority) | 5 (or #10) | An integer defining precedence when an agent matches multiple policies. |
CollectorCtrl allows agents to match multiple policies. If there is an attribute overlap, policies with higher weights take precedence. For example, a specialized #10 policy will safely override a baseline #1 organization-wide policy.
Once all required fields are validated, click Next Step →.
Step 2: Configure Fleet Targeting Rules
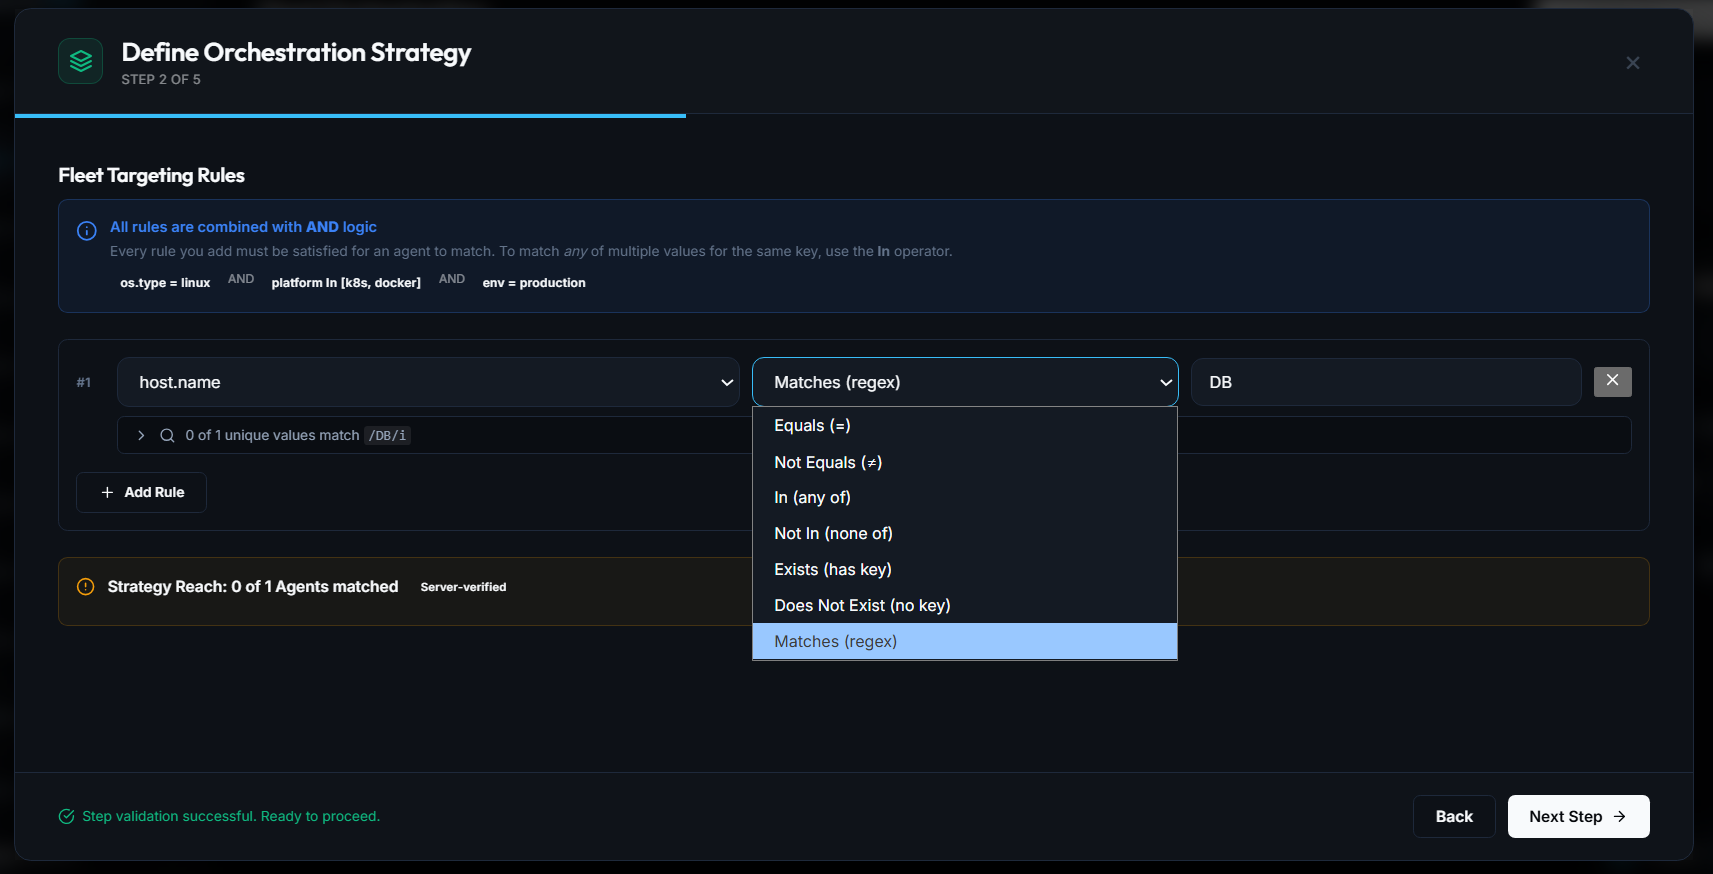
CollectorCtrl uses rich, multi-operator targeting expressions evaluated against live resource attributes reported by connected Supervisor agents:
 Expand
Rule Composition & Logic
- AND Logic Across Rules: Every rule you add must be satisfied for an agent to match.
InOperator for Multi-Value Matching: To match any of multiple values for the same key, select theIn (any of)operator. (e.g.,os.type = linux AND platform In [k8s, docker] AND env = production)
Supported Operators
| Operator | Syntax | Use Case |
|---|---|---|
| Equals (=) | Exact match | Targeting an explicit environment (e.g. env = production). |
| Not Equals (≠) | Exclusion | Omitting specific canary or testing nodes. |
| In (any of) | Set inclusion | Matching multiple target values (e.g. [linux, windows]). |
| Not In (none of) | Set exclusion | Excluding specific regions or legacy clusters. |
| Exists (has key) | Key check | Ensuring an agent reports a custom tag or label. |
| Does Not Exist | Absence check | Identifying unclassified or unmigrated hosts. |
| Matches (regex) | Regular expression | Powerful pattern matching (e.g. host.name Matches DB). |
Real-Time Strategy Reach Verification
As you type regex patterns or select attributes, the console dynamically checks your live fleet:
- Displays how many unique values match your expression (e.g.
0 of 1 unique values match /DB/i). - Calculates Strategy Reach (Server-verified) in real time, showing the exact number of matching agents before you commit the policy.
Click Next Step → to proceed.
Step 3: Choose Configuration & Upgrade Focus
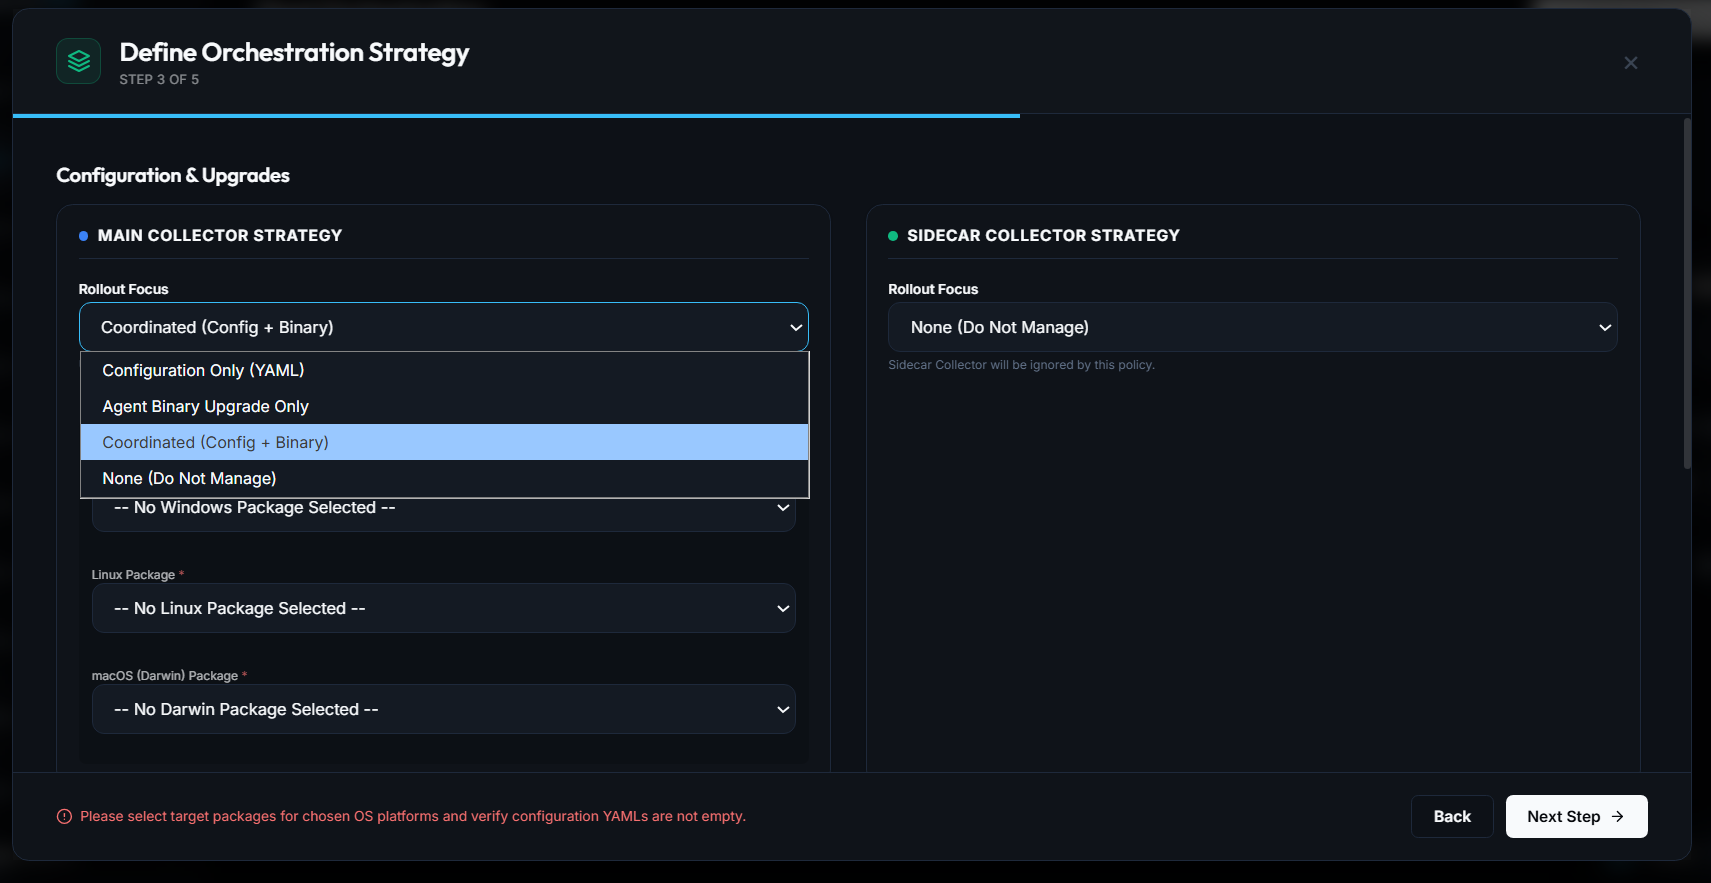
CollectorCtrl separates policy intent into dedicated management streams for both Main Collectors and optional Sidecar Collectors:
 Expand
Main Collector Strategy
In the Rollout Focus dropdown, choose what this policy controls:
- Configuration Only (YAML): Pushes OpenTelemetry Collector configuration YAML to matching nodes without altering the installed collector binary.
- Agent Binary Upgrade Only: Distributes and updates the OpenTelemetry Collector binary without modifying existing YAML pipelines.
- Coordinated (Config + Binary): Simultaneously deploys both a specific collector binary package and its corresponding YAML configuration file in a synchronized atomic step.
- None (Do Not Manage): Leaves the main collector unmanaged.
When binary packages are required, select the target packages for Windows, Linux, and macOS.
Sidecar Collector Strategy
If your architecture runs an auxiliary sidecar collector alongside the host supervisor, configure its rollout focus here or leave it set to None (Do Not Manage).
Click Next Step → to configure the rollout engine.
Step 4: Select Rollout Strategy (Atomic vs. Canary)
CollectorCtrl provides two distinct deployment engines based on your risk profile and rollout requirements:
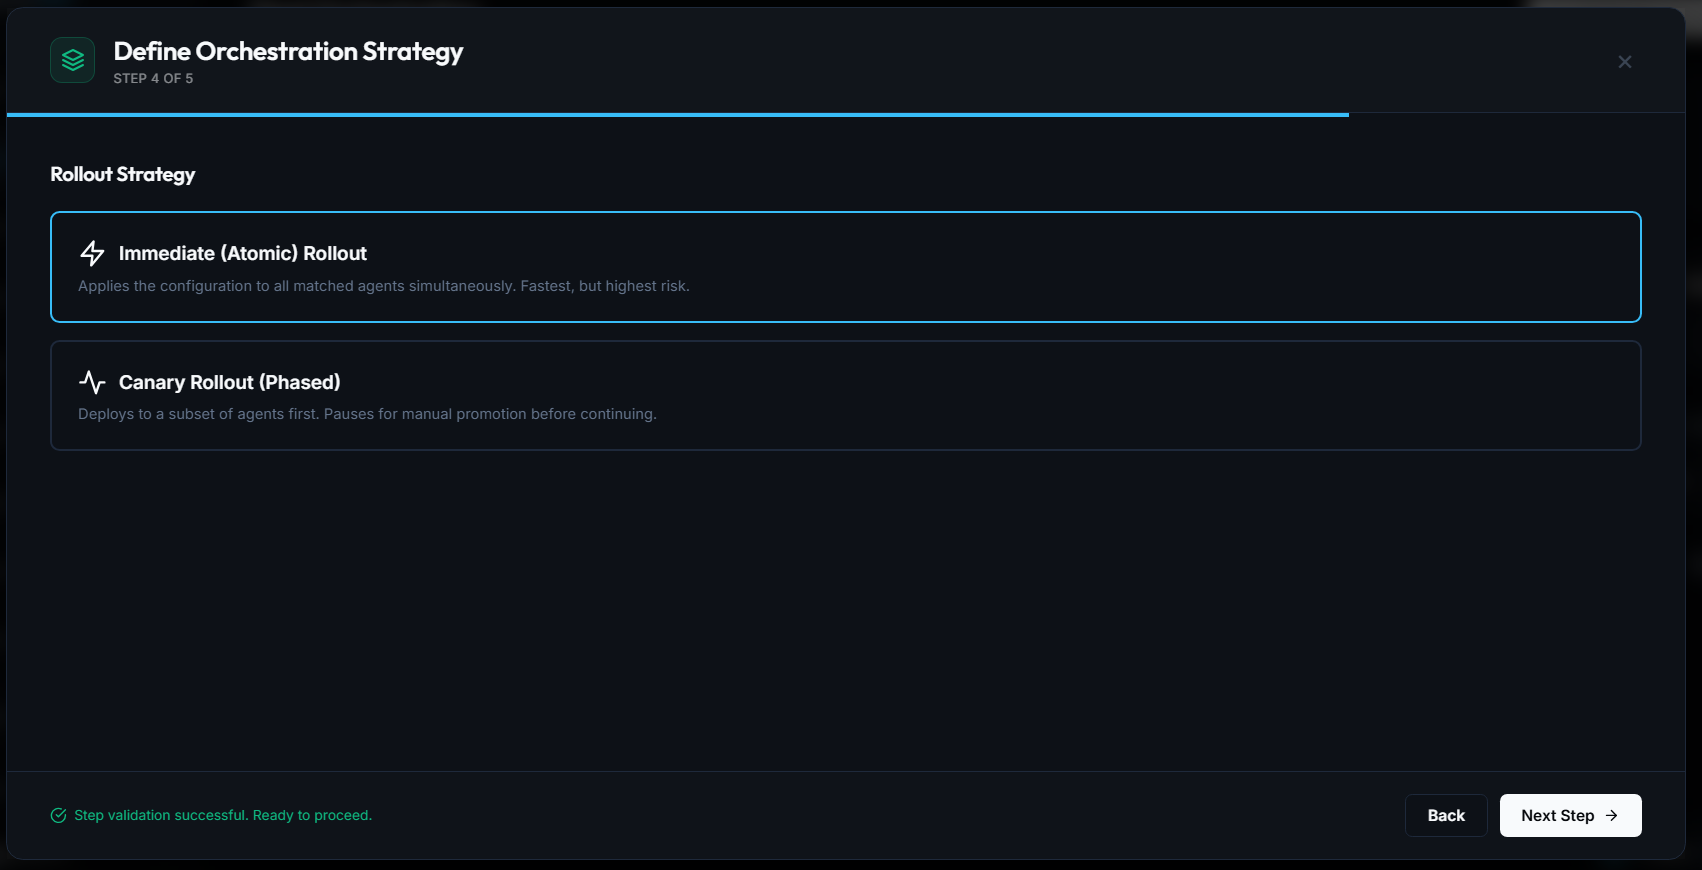 Expand
Option A: ⚡ Immediate (Atomic) Rollout
- Behavior: Dispatches the configuration to all matching agents simultaneously over established OpAMP channels.
- Best For: Non-production environments, local evaluations, or global emergency hotfixes where rapid propagation is paramount.
Option B: 📈 Canary Rollout (Phased)
- Behavior: Deploys the configuration to an initial subset of matching agents (e.g., 10%) first.
- Safety Gate: Pauses rollout progression automatically, allowing engineering teams to monitor collector CPU, memory, error rates, and telemetry output.
- Promotion & Abort:
- Promote: Once telemetry health is confirmed on the canary nodes, promote the change to 100% of the fleet.
- Abort & Rollback: If the canary exhibits errors, abort the rollout instantly to revert the canary subset with zero impact to the rest of the fleet.
Regardless of whether you select Atomic or Canary, every individual Supervisor performs a pre-flight syntax check (otelcol validate) before applying configurations. If a YAML file is malformed, the Supervisor refuses to apply it and reports a Reconciling / Validation Failed error back to the server.
Click Next Step → to reach the final review screen.
Step 5: Review & Deploy
The review screen aggregates all strategy decisions into an immutable audit snapshot:
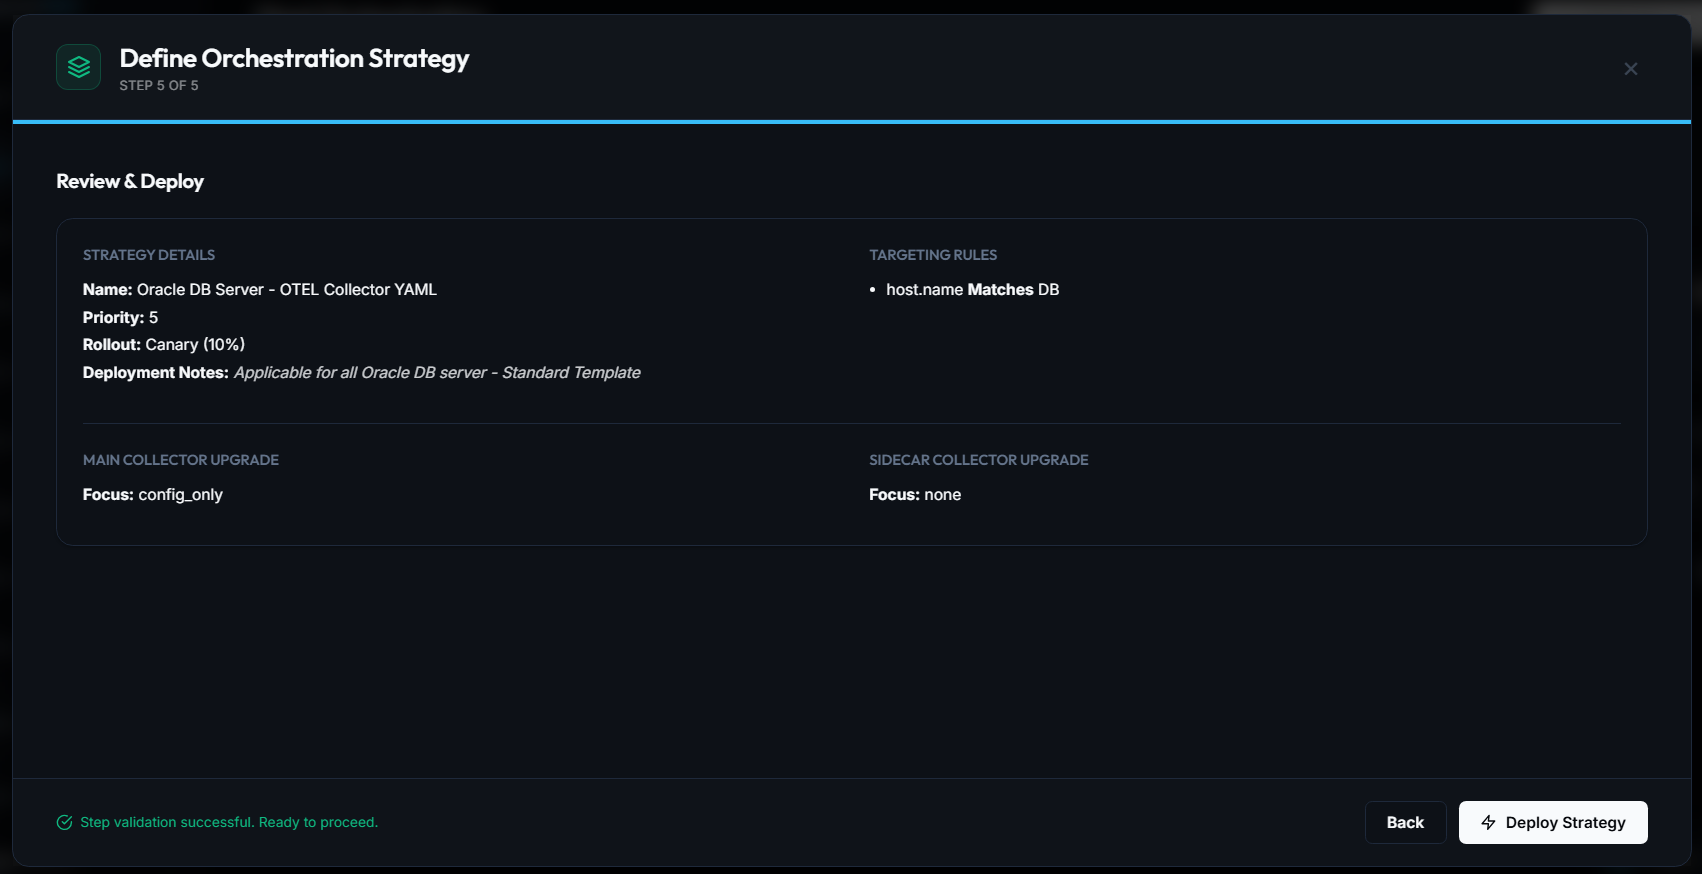 Expand
Verify the deployment summary:
- Strategy Details: Name, Strategic Priority Weight, Rollout Mode (
ImmediateorCanary (10%)), and Deployment Change Reason. - Targeting Rules: The compiled attribute rules (e.g.
host.name Matches DB). - Main Collector Upgrade Focus: (e.g.
config_only,coordinated). - Sidecar Collector Upgrade Focus: (e.g.
none).
Click ⚡ Deploy Strategy to publish the policy.
Step 6: Monitor Propagation & Impact
Once published, the policy becomes active immediately:
Strategy: Oracle DB Server - OTEL Collector YAML
Priority: #5  |  Target: host.name Matches DB  |  Status: Active  |  Propagation: 100% [██████████]
Tracking in the Dashboard
- The Active Orchestrations count increments.
- The Propagation bar displays real-time rollout progress across target agents as they acknowledge configuration receipt.
- The Status pill indicates
Active.
Inspecting Target Node Logs
On any targeted host, you can observe the Supervisor receive the OpAMP update, validate the payload, and signal the collector:
$sudo journalctl -u collectorctrl-supervisor -n 50 --no-pager
PS >Get-Content 'C:\ProgramData\CollectorCtrlSupervisor\supervisor.log' -Tail 50
Sample log output:
[OpAMP] Received remote configuration update for policy: Oracle DB Server - OTEL Collector YAML
[Validator] Running dry-run validation (otelcol validate)... PASS
[Supervisor] Writing effective config to /etc/otelcol/config.yaml
[Supervisor] Restarting collector child process...
[Health] Collector health check on http://localhost:13133: HTTP 200 OK
[OpAMP] Status report: In Sync (Effective Hash: e9a24f0c)
Version History & Instant Rollback
Every deployed strategy maintains a full version history:
- Locate the strategy in the Fleet Orchestration table.
- In the ACTIONS column, click the History (🕒) button.
- Compare diffs between revisions, review deployment notes, or click Rollback to revert to any previous configuration state fleet-wide.
Next Steps
- Upgrade Supervisor Agents Fleet-Wide — Manage supervisor binaries in Settings
- Production Setup Reference — Port definitions and host prerequisites
- Troubleshooting & FAQ — Diagnose agent connection and validation errors